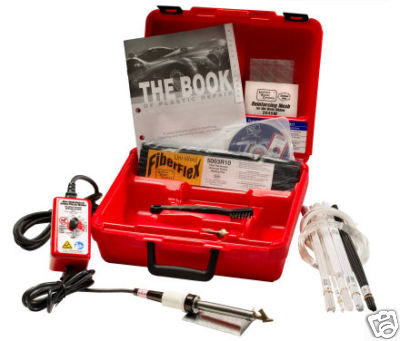
This plastic welder is the next generation in plastic welding technology. Some of the benefits of this new design is that the element, and temperature control can be taken out of the carrying case for more mobility. It even has a belt clip attached.
The Mini-Weld Model UK6 Airless Plastic Welder is a complete kit that you can use to repair all kinds of plastic. This welder is a complete, ready-to-use kit that is jam packed with benefits.
This is just a drop in the Ocean !!. You also have...
|
Just look at some of the ways you can use the Model UK6 Airless Plastic Welder....
- Bumper Covers
- Dirt Bikes
- Door panels
- Dashboards
- Motorcycle fairings
- Armrest supports
- Farm Equipment
- Snowmobiles
- Recreational Vehicles
- ATV's
- Consoles
- Grilles
- Headlight buckets
- Toys
- Lawn Furniture
- Airplanes
- Computers
|

|
What's included
in the kit
. |
List of Contents
5003R1 Polyurethane Rod .......... 15 ft.
5003R2 Polypropylene Rod ........ 15 ft.
5003R3 ABS Rod ........................ 15 ft.
5003R4 Polyethylene Rod........... 15 ft.
5003R5 TPO Rod ........................ 15 ft.
5003R6 Nylon Rod ...................... 15 ft.
5003R7 Polycarbonate Rod ........ 4 ft.
5003R10 FiberFlex Flat Sticks .........15 ft.
6005HT Heating Element ...............1
6027HT Standard Welding Tip .......1
6028RT Round Welding Tip ...........1
2045W Reinforcing Wire Mesh .....1
6124WB Stainless Wire Brush ........1
VIDEO Instructional DVD .............1
Welding Stand ..................1 |
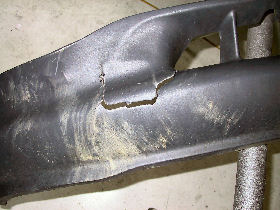
Here we have a lower bumper fascia on a friend’s 1999 Ford F-150 pickup that was damaged by his teenage son driving the truck into a ditch. It demonstrates the steps you’d use for repairing any textured plastic.
Step 1. Clean the plastic with soap and water then 1000 Super Clean plastic cleaner. Heat the distorted area with a heat gun and press the plastic back into position. Quench the plastic with a wet rag once you’ve got it reshaped.
|
|
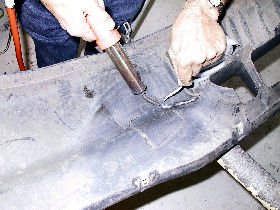
Step 2. Repair backside of bumper with 5003R10 FiberFlex rod and 2045W Reinforcing Wire Mesh.
|
|
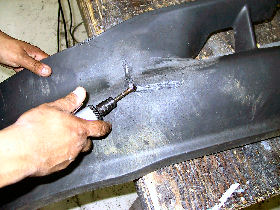
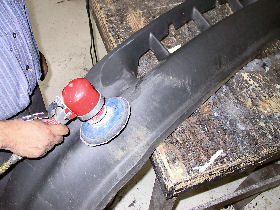
| Step 3. Once the weld on the backside cools, V groove frontside using the carbide burr. Make the groove about 5mm wide and at least halfway through the plastic. Scratch up the groove with a 50 grit Roloc and feather back with 80 grit in a DA. |
|
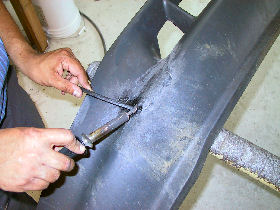
| Step 4. Melt 5003R10 FiberFlex welding rod into the v-groove on the front side. Don’t melt it with the base material; FiberFlex is not a true fusion rod but rather a thermoplastic adhesive that sticks very well to TPO and PP. |
|
| Step 5. Once the FiberFlex cools, sand it smooth with 80 grit in a DA. 80 grit tends to make the soft TPO get fuzzy, so sand everything with 180 grit to remove the 80 grit scratches. |
|
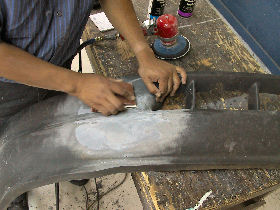
Step 6. Apply Filler Prep adhesion promoter and Hardset Filler to fill in any low spots and imperfections. Profile with a block, then DA with 180, 240, and 320 grit to remove all the fuzz from the TPO.
|
|
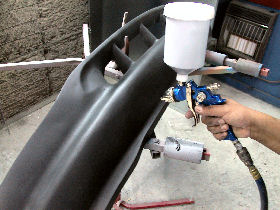
| Step 7. Blow dust free, apply adhesion promoter, then spray on Flex Tex to simulate the original stippled texture pattern. Once dry, lightly rub with medium scuff pad to remove dry spray and cobwebs. |
|
| Step 8. Once you have the texture the way you want it, apply the matching Bumper & Cladding Coat color. B&C Coat matches 41 different shades of gray, making it easy to find a close match for your situation. |
|
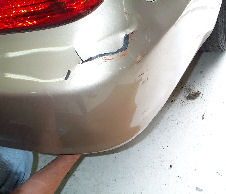
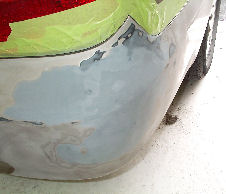
Many times when a bumper is damaged, it can be repaired while it is still on the car. This Camry bumper is a perfect example.
Step 1
| The first step is to get as much of the dent out as possible. We used a heat gun to soften the plastic so that it can be pushed out from underneath. |
|
|
Step 2
| Pushing out the dent makes the repair much easier. The next step will be to align the cracked bumper as much as possible. |
|
|
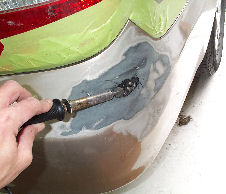
Step 3
| The damaged area was sanded to remove paint from the damaged area and to increase adhesion when the primer is applied. Masking tape was applied to the taillight to prevent damage while sanding. We ground a "channel" along the crack line and buried some mesh into the plastic. The mesh was buried deep enough so that it will be below the surface level when the repair is finished out. |
|
|
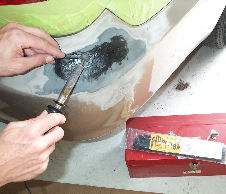
Step 4
| FiberFlex was used to fill in the remainder of the "channel". |
|
|
Step 5
| After sanding and contouring the FiberFlex, we applied of skim coat 2020 SMC Hardset Filler to fill in low spots. The nice thing about 2020 SMC Hardset filler is that it sands so nice. |
|
|
Step 6
| Finish sanding the 2020 SMC Hardset Filler and get it smooth enough to prime. |
|
|
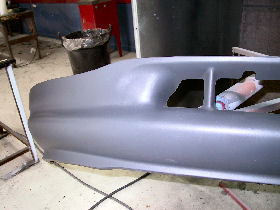
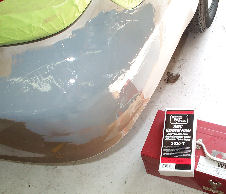
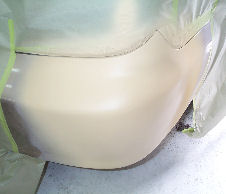
Step 7
| Primer was applied and now it is ready to paint. All of this was accomplished without removing the bumper cover. |
|
|